How to Prepare Data for Client Reports
Creating reports is a two-phase process:
-
Prepare the data (done once per day-ish)
-
Create reports (can be done multiple times using the prepared data)
Think of this like prepping a kitchen. You prep once, then you can cook up multiple reports. This guide covers Phase 1: Data Preparation.
Each day (or when needed), you will export and refresh three data sources:
-
HubSpot Social Posts Data
-
HubSpot Tasks Data
-
WordPress AdRotate Data
All exported data is uploaded into the master Google Sheet and replaces the old data tabs.
Master Google Sheet:
https://docs.google.com/spreadsheets/d/1picHzy_LXatys1EZafkQDMkeuyPENlowy_lv0gdMiG4/edit?gid=351458795#gid=351458795
1. Export & Replace HubSpot Socials Data
Export from HubSpot
-
Go to: https://app-ap1.hubspot.com/social/43811754/manage/published
- Set the Date Range to be the January 1st of the previous year (e.g. 1/1/2025) through to today's date. Exporting ALL historical posts makes a file that's too large for importing later.
-
Click “Export posts” (see screenshot).

-
Select your email from the dropdown and click Export to confirm (see screenshot). Wait for the email and download the file once delivered.

Import into Master Sheet
-
Open the Master Google Sheet. Click File → Import (see screenshot).

-
Select Upload → Browse (see screenshot). Locate your Socials export file, click Open.

-
In the Import File popup, change the import location to “Insert new sheet(s)” (see screenshot), then click Import data. Wait for the upload to complete.

- Three new tabs will appear. Only “Export All” is required. Delete “Last 7 Days” and “Previous Month” sheets.
Clean & Replace Old Data
Now it's time to replace the old Socials data sheet with this new one you've imported. The proper way to do that is by renaming each tab.
-
Double-click the existing tab named SOCIALS and copy the title. Then, type a full stop at the end, so the tab title becomes SOCIALS. with a full stop.
-
Next, double-click the new “Export All” tab and paste the title to rename it to SOCIALS without a full stop.
-
The COMBO tab will now be reading from the new SOCIALS tab. Once you've confirmed this is working (the COMBO tab isn't showing an error), you can delete the old SOCIALS. tab safely.
And you're done! The Master Google Sheet is now working with up to date Socials data.
2. Export & Replace HubSpot Tasks Data
Export from HubSpot
-
Go to: https://app-ap1.hubspot.com/reports-list/43811754/120972159/
-
Click Actions → Export unsummarised data (see screenshot). Click Export in the popup.

-
Download the file from your email. Click the ZIP file to expand it into a folder. Inside the expanded folder, you are looking for the file that is NOT labelled “hubspot summary”.
IMPORTANT NOTE:
How to change the filter settings on a HubSpot report (with screenshots)
Find the report the same way you would when doing the usual data export, but instead of using the Actions button now, we’re going to click on the report name to go in and change the settings.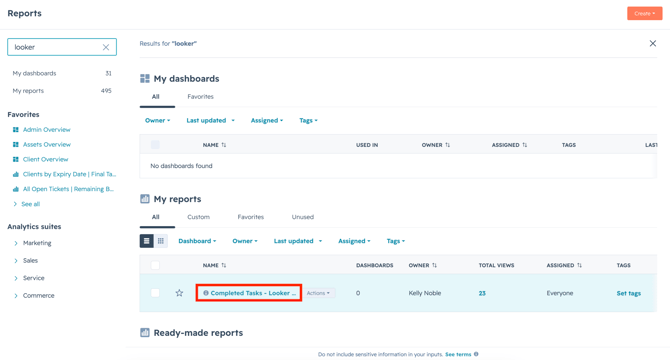
You’ll get a full report view of the data here. We want to click the Customise button to change the report settings.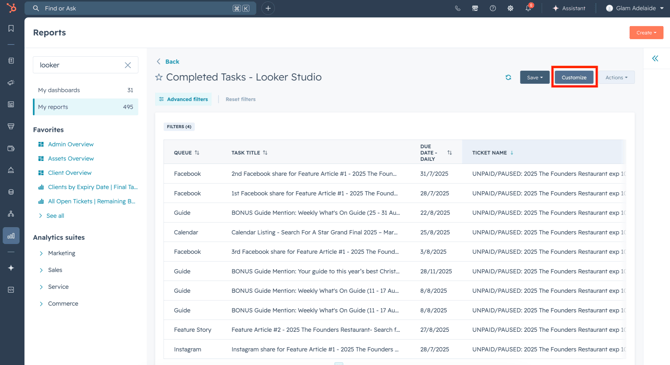
The Customise button will take you to the Report Builder page, where all decisions about what appears in the report data are set. Go to the Filters tab to change the settings for the date range.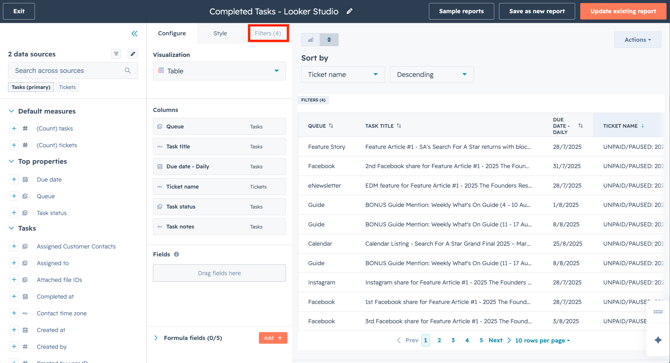
On the Filters tab, you can see all the filter settings for the report. Click the one you want to change. In this case, it’s the filter for the task Due Date. See below: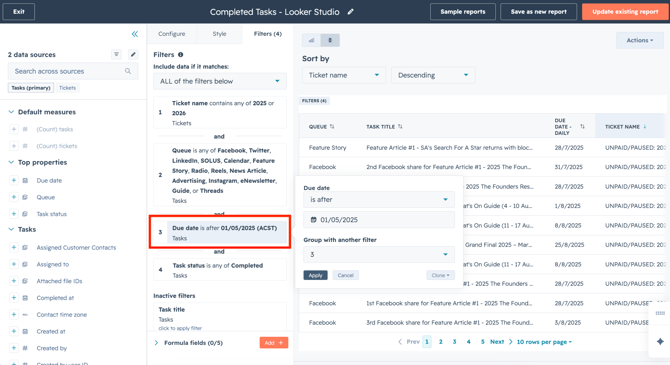
Change the filter logic. In this case, we want to see tasks that are older than 01/05/2025. So, we’ll change the cut off for Due Date to 01/05/2025 instead. Click Apply.
When you’re done, in the top right corner click Update Existing Report and your changes to the report settings will be saved for the future.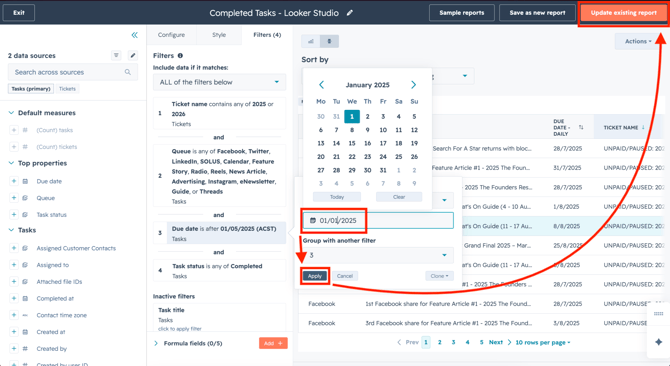
Click Exit in the top left corner to leave the Report Builder, and you will be taken back to the full report view. Here, you can use the Actions button as usual to Export unsummarised data, and you’re done!
Import into Master Sheet
-
Open the Master Google Sheet. Click File → Import. Select Upload → Browse.
-
Navigate inside the unzipped folder and select the correct Tasks export file (aka NOT the one labelled “hubspot summary”).
-
In the Import popup, choose “Insert new sheet(s)” then click Import data. Wait for the upload to complete.
IMPORTANT STEP: Scroll to the bottom of the imported sheet and DELETE the two blank rows at the end. (HubSpot didn't use to include these rows but now they do for some reason! If these blank rows are not removed, reports will break.)
Replace Old Data
Now it's time to replace the old Tasks data sheet with this new one you've imported. The proper way to do that is by renaming each tab.
-
Double-click the existing TASKS tab and copy the name. Then, add a full stop so it becomes TASKS. with a full stop.
-
Next, double-click the title of the newly imported tab. Paste text to change the tab title to TASKS without a full stop.
-
Confirm the COMBO tab is reading this new sheet correctly (isn't showing an error), then you can delete the old TASKS. tab safely.
3. Export & Replace WordPress AdRotate Data
Go to Plugins on the Wordpress dashboard > Ctrl F > WP Data Access > Activate > hit the Explorer button. See below for next steps. Once you've done the below, go back into the Plugin, turn it back on.
Export from WordPress
-
Go to: https://glamadelaide.com.au/wp-admin/admin.php?page=wpda
-
Expand the first dropdown, then expand Views, find vw_adrotate_by_ad, and click Explore (see screenshot).

-
Click the End Date column once, then click it again to sort by most recently expired ads. Then, click the Select All checkbox (see screenshot).

-
Click Bulk Actions, ensure Export to CSV is selected, then click Apply (see screenshot). The export file will download.

Import into Master Sheet
-
Open the Master Google Sheet. Click File → Import. Select Upload → Browse.
-
Locate your AdRotate CSV file and click Open.
-
In the Import popup, choose “Insert new sheet(s)” then click Import data.
Replace Old Data
Now it's time to replace the old Tasks data sheet with this new one you've imported. The proper way to do that is by renaming each tab.
-
Double-click the existing ADVERTS tab and copy the name. Then, add a full stop so it becomes ADVERTS. with a full stop.
-
Next, double-click the title of the newly imported tab. Paste text to change the tab title to ADVERTS without a full stop.
-
Confirm the COMBO tab is reading this new sheet correctly (isn't showing an error), then you can delete the old ADVERTS. tab safely.
NOTE: If you do this and experience issues, delete the old "Tasks" tab, and replace with the imported data. Same goes with the "Socials" tab.
Data Prep Complete
You have now updated the SOCIALS, TASKS, and ADVERTS data. The COMBO tab is now pulling from fresh data and reports will use up-to-date information.