Reports for $700 Fringe packages are not budgeted into the package price, so the "report" is just an email. Putting together all the stats is still fastest using LookerStudio, but the contents will be copy+pasted into an email at the end.
Open Glam Master Sheet
- Open this spreadsheet: Glam Data Master Sheet
- Refresh the data if needed: How to Prep Data for Client Reports
1. Filter the COMBO tab by Client Project
-
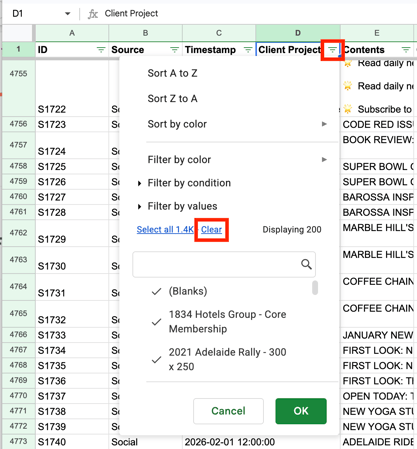
In the Master Google Sheet, open the COMBO tab.
-
In Column D (Client Project), toggle the filter off/on to reset it.
-
Click the green dropdown arrow beside the Client Project header. Click Clear to deselect all default options (see screenshot).
-
In the search bar, begin typing the name of the Fringe Project you want to report on. Select all relevant matching entries...
⚠️ Important context! This column combines:
1. Ticket Names (Tasks data)
2. Campaign Names (Socials data)
3. Advert Names (AdRotate data)
Most of the time, Ticket and Campaign names will match - but occasionally they will not. If there are discrepancies, select both. Also check for related website MREC advertising.
There WILL be MREC for all Fringe Clients. If its missing, make sure your data is fresh.
2. Filter the TASKS tab by Ticket Name
- Go to the TASKS tab. Filter the sheet using Column D (Ticket name) to only display what is relevant to your client. This will give you a list of everything on the Ticket that was completed.
-
Check to ensure the following are in the list (in any order):
- Feature Article task - MUST have the article's FULL URL in the task notes
- Calendar Listing task
- EDM Feature task
- Possibly: Show Review task (not all shows will have been reviewed) - MUST have the article's FULL URL in the task notes
- If any other tasks have URLs in the task notes field, delete the contents of the field.
There will be other socials and advertising tasks present, but for these we are only using data from the SOCIALS and ADVERTS pages.
3. Look for Review Article (if missing)
Not every Fringe client will have a review written about their show, but those that have are usually written by the volunteer review team. They do not have access to HubSpot and cannot log their articles to the client tickets. So, if no review has been logged, find out if one exists.
- Go to this Notion sheet: Fringe Schedule
- Locate the Fringe Review for the show you're reporting on (use the search bar for ease).
- If the Status property is set anything other than 'Reviewed', skip down to Step 4.
- If the Status property is set to 'Reviewed', scroll across to get the Review Link, and copy.
- Go to the Master Sheet TASKS tab, locate the existing "Feature Article #1" task.
- Duplicate that feature article row. Change the row contents as follows:
- Queue: must be 'Feature Article'
- Task Title: change to 'Show Review' (that's all thats needed in this field)
- Task Notes: paste the review article's FULL URL here.
- Go to the Master Sheet COMBO tab, refresh the filter by clicking the green dropdown button then click the green 'OK' button.
4. Go to Report Helper tab
As long as the COMBO tab is correctly filtered, here you should see:
-
Cell A3 (Client Project Filter)
-
Ticket name,
-
Campaign name (if different to Ticket),
-
Adrotate MREC name
-
-
Cell B3 (Page Path Filter):
-
Page path of the feature article
-
Page path of the show review article (if one exists)
-
Open LookerStudio Template
We reuse the same template over again because we don't need to create a whole new file.
-
Open this LookerStudio file: 2026 FRINGE TEMPLATE - Glam Adelaide Campaign Report
1. Set Global Report Filter: Client Project Filter
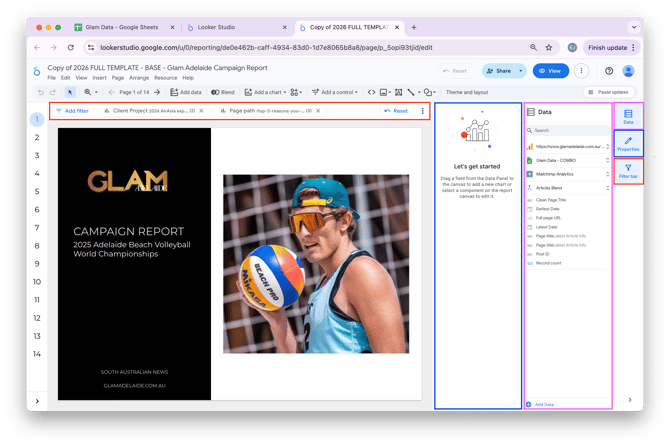
- Along the right of the screen, three buttons toggle different panels in the view. The Filter Bar (red), the Properties Sidebar (blue) and the Data Sidebar (pink).
-
Ensure the Filter Bar (red) is visible along the top. Click the Client Project filter in the bar to select it.
-
Make sure the Properties Sidebar is open on the right of the window (blue). It can be toggled using the button on the right (blue). This will show details about the selected filter.
-
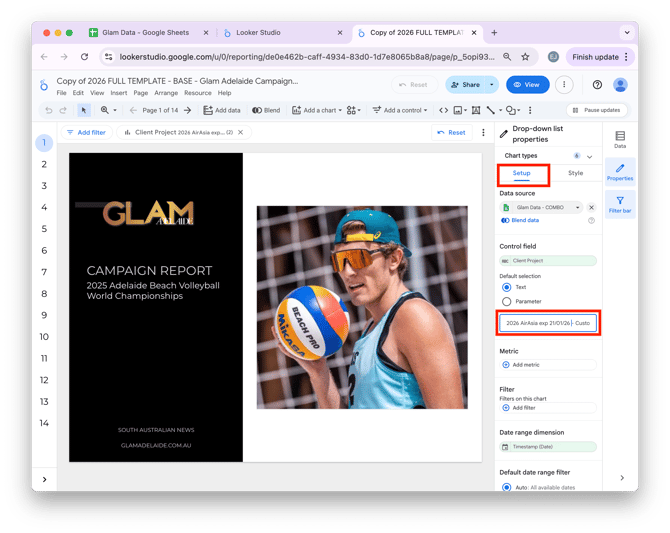
In the Properties Sidebar, select the Setup tab, then find the Default selection textbox (see screenshot). Remove any existing contents.
-
Return to the Master Google Sheet's Report Helper tab and copy the contents of cell A3 (the one labelled “Client Project Filter”).
-
Paste this text into the Default selection textbox indicated in the screenshot above.
- Deselect the Client Project filter by clicking away onto the grey background that surrounds the report page. You'll know you've properly deselected the filter if the Properties Sidebar returns to saying "Let's get started'.
2. Set Global Report Filter: Page Path Filter
-
In the Filter Bar along the top, click the Page path filter.
-
Ensure the Properties Sidebar is open and the Setup tab is selected.
-
Find the Default selection textbox. Remove any existing contents.
-
Return to the Master Google Sheet's Report Helper tab and copy the contents of cell B3 (the one labelled “Page Paths Filter”).
-
Paste this into the Default selection textbox, then click away onto the grey background surrounding the page to deselect the filter.
Your report will now be filtered to only calculate stats based on the correct records (data from COMBO sheet), and relevant Article URLs (data from Google Analytics).
Open Outlook Email
The content of the report is now ready to be copy/pasted into an email.
1. Transfer Looker Studio Content
- In LookerStudio, click the dark blue "View" button at the top of the screen.
- Highlight the subject text on the page that starts with "REPORT:" and copy it.
- Open Outlook Web and start a new email. Wait for the HubSpot Sales Add-in to load, then paste into the email's subject line.
- Back in LookerStudio, highlight everything from "Hi XXX," down to "Warm regards," (do not highlight the Total Reach number) and copy it.
- In Outlook, right-click in the body of your email and select "Paste as plain text".
Your report content is now ready to be edited.
2. Edit Email Content
- Manually bold the three headings:
- Campaign highlights:
- Your show was featured across:
- Overall campaign reach:
- Place your cursor at the end of a URL, press enter, then press backspace. The URL will now be formatted as a hyperlink.
- If the Fringe client had no Show Review article, delete the line beginning with "- Your Review Article" (this field will say 'No data' if there was no review article URL done)
- Back in LookerStudio, copy the 'Total Reach' figure. Paste it in place of the XXX that appears in the line beginning with "Your campaign achieved a combined reach of XXX,"
- Back in HubSpot on the client's Fringe ticket, copy the name of the primary contact. Paste it in place of the XXX that appears in the opening line "Hi XXX,"
- Back on the ticket, copy the name of the Fringe Show. from the Ticker Title. Paste it in place of the XXX that appears in the line beginning with "Across the campaign, XXX,"
- Go back to the email's subject line and paste the Fringe show title in place of the words "Show Name"
- At the very bottom of the email, type your first name underneath "Warm regards,"
3. Send Client Fringe Report (if authorised)
If you are authorised to be sending reports out to clients, follow these steps. Otherwise, send the email to someone who is authorised so they can review it before it's sent to the client.
- On the client ticket, copy the email address of the primary contact. Paste it into the Send To field of your email.
- If anyone has requested to be cc'd, do that now.
- In the HubSpot Sales Add-on, make sure that the email is being logged to:
- The correct Contact record
- The correct Company record
- The correct Fringe Ticket record
- Send the email.
Finishing Touches
1. HubSpot
- Pop back over to the HubSpot ticket. Tick off these tasks:
- Create Create campaign report
- Send campaign report (only if the report has actually been sent)
- Change the status of the client's Fringe Ticket from 'Complete Package Benefits' to 'Package Completed'
-
If the Show Review task is incomplete:
- If a review article was done, copy and paste URL from the Review Link field in this Notion sheet: Fringe Schedule. Tick the task to set it as complete.
- If no review article was done, delete the task.
2. Notion
- Go to this Notion sheet: Client Reports
- Locate the Fringe client report you've just completed (use the search bar for ease).
- Set the Status property to 'Done'.
- Scroll across to find the small checkmark box (right after the Progress property), check it. The line will disappear from view as it is now complete.