So you want to invent a new Client Journey. This will involve 3 stages of set up.
Stage One: Update the settings for the relevant HubSpot properties.
Stage Two: Create the materials/content that will be sent to the client.
Stage Three: Update the relevant workflows so the Client Journey runs automatically.
Stage One: Settings for Client Journey Dropdown Options
There are 2 different “Customer Journey” properties in HubSpot. The first exists on Deal records, the second exists on Contact records. You will need to add the name of your new Client Journey to both of these dropdown fields.
To do this, follow the below steps:
- In HubSpot, navigate to any Deal, click the Settings icon in the toolbar (shaped like a cog).
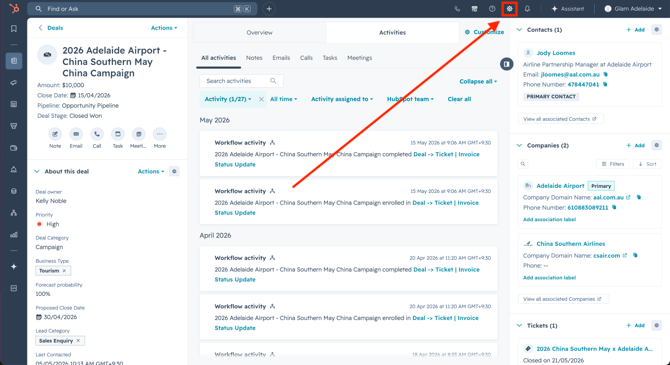
- You will be taken directly to the settings for Deal records. Here, click the link that reads Manage Deal properties.

- This page contains the settings for every property a Deal record has. Use the search bar to find the Customer Journey property, and click on it to open the property's settings.

- In the property settings, click on the Field type tab in the left sidebar.
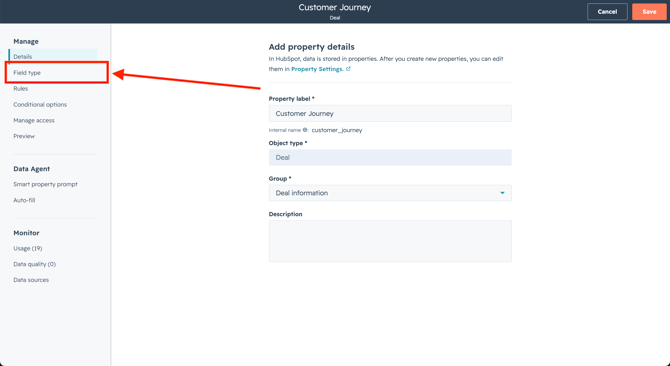
- Here you can change anything about the property. In this instance, we want to create a new option that can be selected. These are called "Radio options", meaning only one option can be chosen at a time (unlike "Multi-select options" where you can choose several at once).
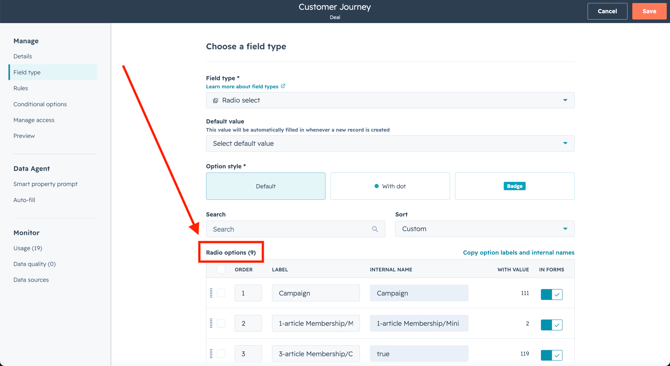
- Scroll to the bottom of the page and find “+ Add option” to create a new option. You can also rename other options, or rearrange the order that the options will be displayed. Make sure to leave the switch setting for “IN FORMS” set to active.
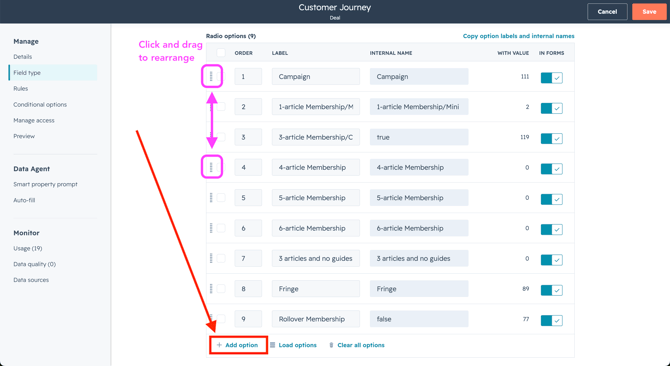
- When you’re done, click Save in the top right.
Now when you use the Customer Journey field on a Deal record, you will see the updated list of "Radio options" in the dropdown menu.
Next, do the same for Tickets: Navigate to any Ticket record and click the Settings icon in the toolbar. This will take you directly to the settings for Ticket records, and from here you can follow the same steps as above.
Stage Two: Client Journey Content
The material/content we will create for a new Client Journey includes:
1) The automated Welcome Email the client will receive.
2) The Strategy Document Form the client will fill out.
3) The automated Confirmation Email the client will receive once they submit the form.
When all three of these are created, we will then:
4) Create a workflow to automatically send the Confirmation Email once the Strategy Document Form is submited.
5) Insert the correct Strategy Document Form submission link into the matching Welcome Email, so the client will be given the link to submit the right form.
UPDATE: I have later discovered that it is more efficient to create these in the order:
2) Strategy Document Form -> 3) Confirmation Email -> 1) Welcome Email.
Then, do 4) automate the Confirmation Email -> 5) insert correct form submission link.
However!!! If this is your first time following the process, please complete the steps in the order shown, because the instructions and screenshots will be most helpful that way.
Step 1: Set up a new automated Welcome Email
- In HubSpot, go to Marketing > Email.
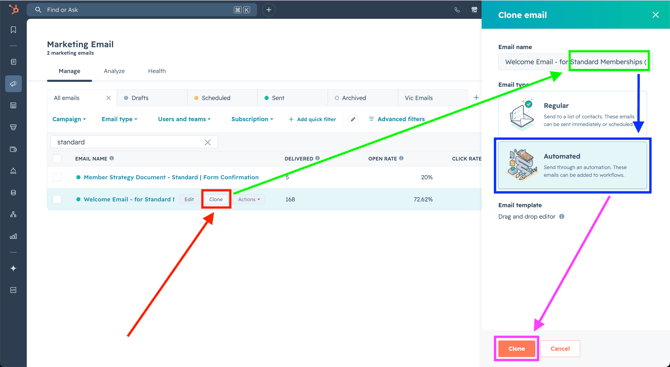
- Use the search bar to find an existing automated Welcome Email that most closely resembles the new version you want to make. This will give you a good starting point.
- When you've found the email, hover on it and click Clone button (shown in red).
- In the pop-up sidebar that appears, rename the Welcome Email (shown in green).
- Keep the Email type set to “Automated” (shown in blue).
- Click Clone (shown in pink).
- You'll be taken to the email editor view. Here you can alter the new cloned Welcome Email.
- Edit the email content as needed (edit area shown in blue).
- NOTE: You will not be able to replace the existing Strategy Document Form link, because we haven’t made the new form yet. We'll come back and replace this link later in Step 5.
- At the top of the email, click the Send to field and choose the following send settings (shown in red).
- How will you send this email: “Through an automation”
- Subscription type: “Member Communications”
- Don’t send to unengaged contacts: SWITCHED OFF.
- Edit the email content as needed (edit area shown in blue).

-
- At the top of the email, click the Inbox content field to pick the inbox settings (shown in red).
- Change Subject line and Preview text as needed.
- Hide body text from preview text: tick to TRUE.
- From name: “Glam Adelaide Client Services” unless told otherwise.
- From address: “clientservices@glamadelaide.com.au”
unless told otherwise. - Use as reply-to address: tick to TRUE, unless told otherwise.
- At the top of the email, click the Inbox content field to pick the inbox settings (shown in red).
- In the top toolbar, use the Preview and test function to check that your email contents will show up properly customised for the recipient, then Send test email to yourself/a colleague to double check (shown in green).
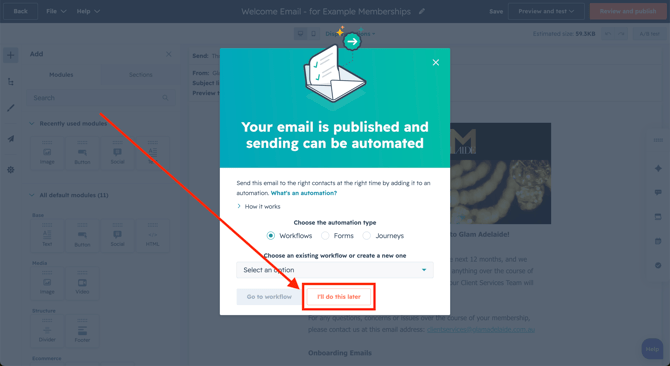
- Once you are satisfied with the email contents, click Review and publish in the top right. You can come back and edit again later as needed (shown in blue).

- When the confirmation pop-up appears, it will try to get you to choose an automation to send the email. Instead, click “I’ll do this later”.
- NOTE: Later steps will not work until this marketing email has been “Published”, but you do not have to set an automation for it to be successfully published.
Step 2: Set up a new Strategy Document Form
- In HubSpot, go to Marketing > Forms.
- Use the search bar to find an existing Strategy Document Form that most closely resembles the one you want to make (shown in red). This will give you a good starting point.
- Hover over the form and click the Clone button. (shown in blue).
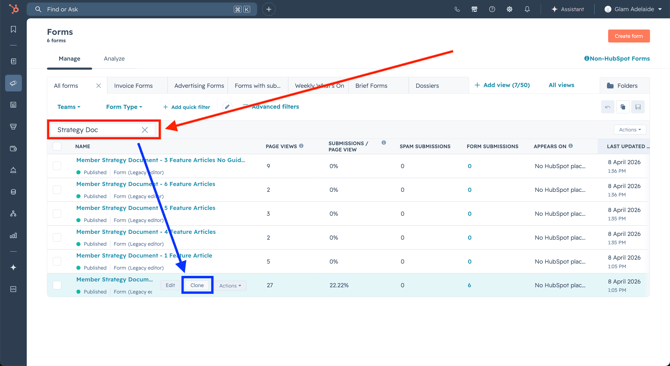
- In the pop-up that appears, rename your form, then click Clone.
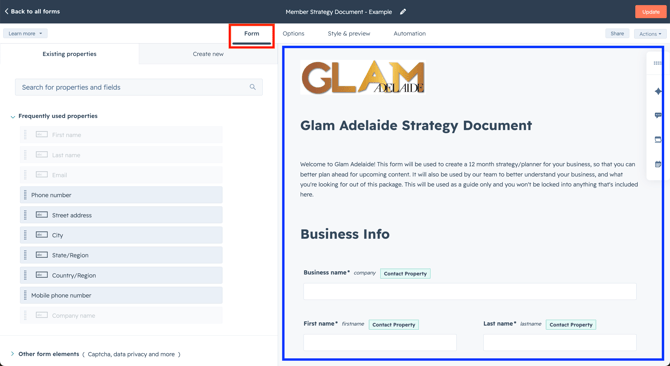
- On the Form tab (shown in red):
- Customise the contents of the new Strategy Document Form as needed (edit area shown in blue).
- Take note of which fields you remove/edit/add, as this will be relevant later when you are creating the new Confirmation Email.
- On the Options tab (shown in red):
- Customise the thank you message as needed (shown in blue).
- Scroll down to the Send submission notifications to field. Select teams or individual users that should be notified via email when the form is completed by someone (shown in pink).
 (scroll down)
.png?width=670&height=368&name=(Pic%2014).png)
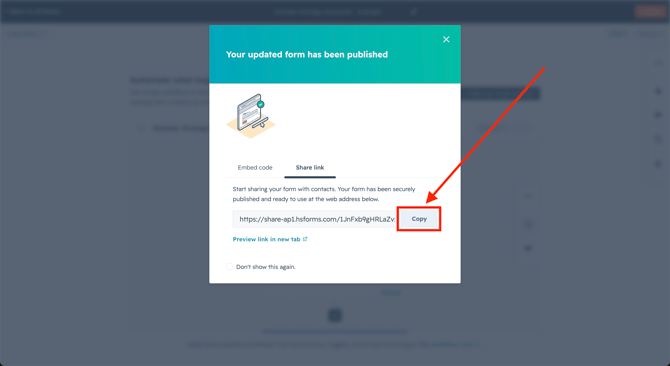
- Click Update in the top right. In the sidebar that appears, click Publish.
- In the pop-up that appears, copy the link. Save it somewhere - this is the submission link for your newly created form, and it will be used in later steps.
- Note: We will return here later, to create a workflow that automatically sends the Confirmation Email we are about to create.
Step 3: Set up a new form submission Confirmation Email
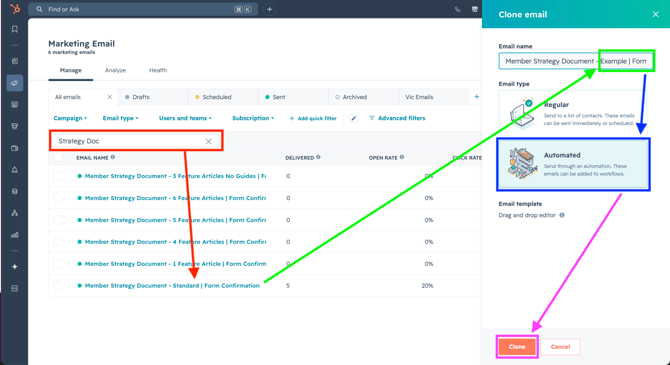
- In HubSpot, go to Marketing > Email. Use the search bar to find an existing automated Strategy Document Form Confirmation Email that most closely resembles the one you want to make, aka the one that matches the form you cloned originally (shown in red).
- When you've found the email, hover on it and click the Clone button.
- In the pop-up sidebar, rename the Confirmation Email (shown in green).
- Keep the Email type set to “Automated” (shown in blue).
- Click Clone (shown in pink).
- At the top of the email, set the Send to settings and the Inbox content settings, the same as outlined in the previous instructions for the Welcome Email in Step 1.
- You will need to edit the content of the email to match the content of the Strategy Document Form created in Step 2. For each field in the form, make sure the email has:
- The client-facing name of that field, written out in bold.
- In this case, the client-facing name of the field we added to the form in Step 2 was "Feature Article 2: Topic" (shown in red).
- Beneath that, a personalisation token which will display the contents of that field.
- To add a personalisation token, place the cursor where you want to insert it, then click the Personalize button in the top right (shown in orange).
- This will insert a token that auto-fills with information stored somewhere in HubSpot. In this case, it pulls information from the Contact Record of the person receiving this email (shown in yellow).
- You will need to select the relevant field from the Token dropdown. In this case, the internal name of the field we added to the form in Step 2 was "Edit Feature Article 2: Topic" (shown in green).
- You are required to enter a Fallback value (this is what will display in the email if HubSpot sees the field is empty). In this case, we want nothing to display if the field is empty, but because we can't leave it blank, instead type a single space: ' ' (shown in blue).
- Click Insert (shown in pink).
- The client-facing name of that field, written out in bold.

-
- Repeat this for every field that was removed/edited/added to the form in Step 2.
- Make sure the personalisation token is NOT also set to bold - we only want to bold the client-facing field title, not the contents of the field.
- After previewing and sending a test email to make sure all the personalisation tokens work correctly (use the instructions outlined in Step 1 to confirm), click Review and publish.
- When the confirmation pop-up appears, it will try to get you to choose an automation to send the email. Instead, click “I’ll do this later” the same way we did earlier.
Step 4: Make a workflow that triggers the Confirmation Email to send
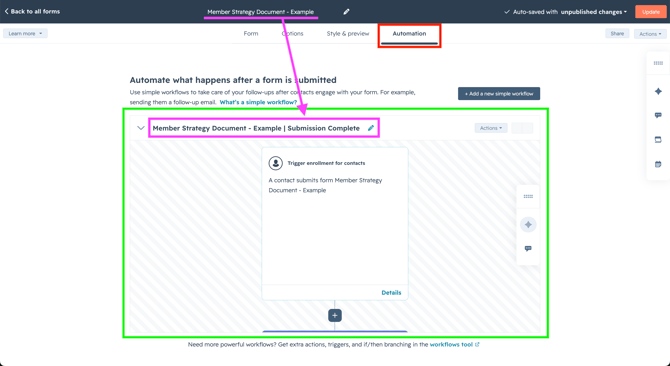
- Go back to the form you created in Step 2, and click Edit form.
- On the Automation tab (shown in red):
- You will see two boxes, the left one called: Send an email after form submission. This is the one we want! Inside that box, click Create a workflow, and a workflow editing area will appear (shown in green).
- Rename the workflow from “Send a follow-up email after form submission” to match the form name, with “ | Submission Complete” added to the end (shown in pink).
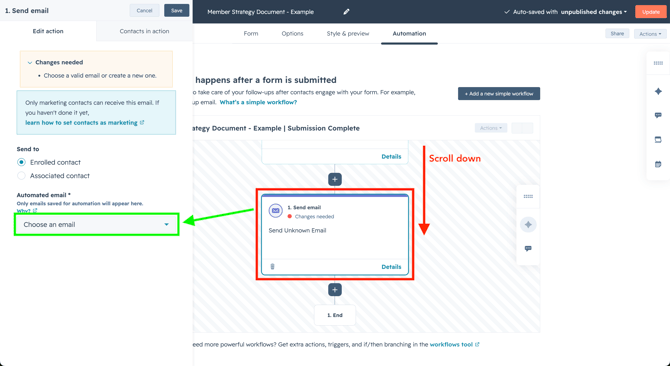
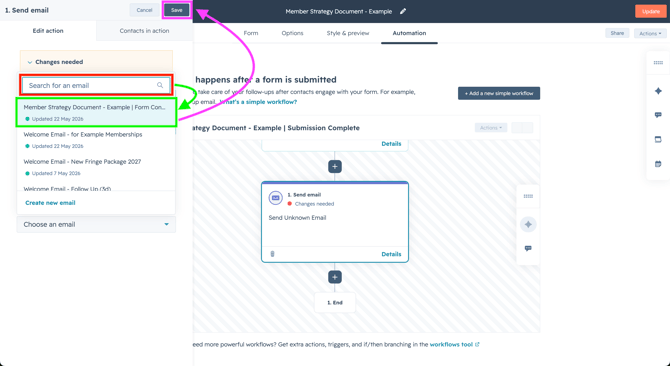
- Scroll down in the workflow edit area to find the Send email action. Click on it to edit the action (shown in red).
- In the sidebar that appears, find the Choose an email dropdown (shown in green).
- Use the search bar to find the Confirmation Email made in Step 3 (shown in red).
- Once you have located the correct email, click on it to select it (shown in green).
- Click Save (shown in pink).
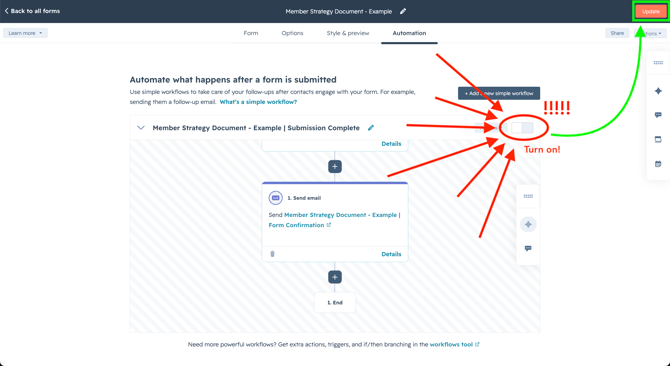
INCREDIBLY IMPORTANT: You MUST activate the workflow, or it will never run!
- Activate the workflow using the little switch button at the top right of the workflow edit area, indicated in the screenshot below (shown in lots of red).
- Once this activation switch is set to active, click Update in the top right (shown in green).
- In the sidebar that appears, click Publish.
Now when a client fills out your new Strategy Document Form, they will automatically be sent a copy of their form responses for their owv future reference, via the Confirmation Email.
Step 5: Insert the new form submission link into the Welcome Email:
- Go back to the Welcome Email you created in Step 1, and click Edit Email (be sure you are not accidentally editing the Confirmation Email created in Step 3!).
- In the body of the email, scroll down to find the section titled Complete your Strategy Document (shown in red).
- Here, there is hyperlinked text that reads “You can do that here.” Click within the text and select the small pencil icon that appears, so you can edit the link (shown in green).
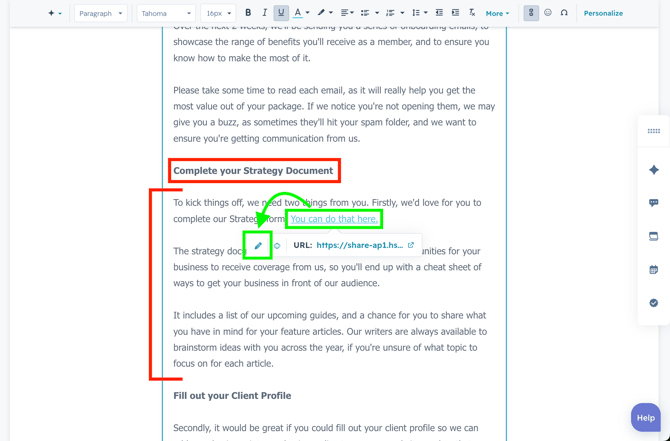
- Replace the existing url with the form submission link for your new Strategy Document Form created in Step 2. Click Apply.
- Then, click Update in the top right corner of the email editor.
- In the pop up that appears, click Publish updates to complete the Welcome Email.
Now when a client is sent their automated Welcome Email, it will contain a form submission link for the correct Strategy Document Form.
Stage Three: Client Journey Automation
Finally, we have to automate the relevant automations for the Client Journey so that it runs automatically as soon as a Deal becomes Closed Won. There are 3 HubSpot workflows that automate the Client Journeys:
1) Automation 1: Closed Won Deal | Enrol contacts in Customer Journey
-
This automation triggers when a Deal is set to Closed Won.
-
It looks at which Customer Journey was selected on the Deal, and copies that choice over to the Contact Records of all Primary Contacts linked to the Deal.
2) Automation 2: NEW Client Journey
- This automation triggers when a Contact Record has its Customer Journey field set.
- It will make sure the enrolled contact is set as a Marketing Contact, send their automated Welcome Email, check if the email was successfully delivered, and send a follow up email after 3 days if the client has not actioned anything.
- This automation triggers immediately when a Contact Record exits the previous workflow.
- It will check the contact's Customer Journey field to decide whether or not this client should receive the subsequent extra client onboarding emails.
***NOTE: Automation 3 currently does nothing! It is active, but will send no emails.
Automation 1: Copy the Customer Journey from Deal to Primary Contacts
- In HubSpot, go to Automation > Workflows. Use the search bar to find the Closed Won Deal | Enrol contacts in Customer Journey workflow.
- Click on the second branch step, which is labelled “Branch based on Customer Journey”.
- In the sidebar that appears, scroll down to see if the new dropdown field option you created in Stage One has automatically appeared in the list of branches.
- If it hasn’t, add a new branch manually with the “+ Add a branch” button. Name the branch after the new dropdown option made in Stage One, then click Save.
- Scroll across the workflow to find any existing branch (except for the Fringe branch).
- On the existing branch, find the action called Edit record. On that action, click the Clone button (shaped like two overlapping squares) and clone it over to your new branch.
- Over on your new branch with your cloned Edit record action, click on it, and in the pop-up that appears, change Chose a value to match the new client journey you’re creating.
Now when a Deal is set to Closed Won, the value selected in the Customer Journey field will be copied over to all the Contact Records linked to the Deal.
When this field is updated on the Contact Records, it triggers the workflow below…
Automation 2: Send correct Welcome Email and follow-up reminders
- In HubSpot, go to Automation > Workflows. Use the search bar to find the NEW Client Journey workflow.
- Click on the first branch step, which is labelled “Branch based on Customer Journey”.
- In the sidebar that appears, scroll down to see if the new dropdown option you created in Stage One process has automatically appeared in the list of branches.
- If it hasn’t, add a new branch manually with the “+ Add a branch” button. Name the branch after the new dropdown option made in Stage One, then click Save.
- Scroll across the workflow to find an existing branch (not the Fringe branch, this one is different to others).
- On the first step of that branch (which will be a Send email step that triggers an auto Welcome Email) find the Clone button, which is shaped like two overlapping squares.
- Click the clone button, then click Clone this action and all following actions. This will temporarily turn on the 'Cloning View' until you have finished cloning.
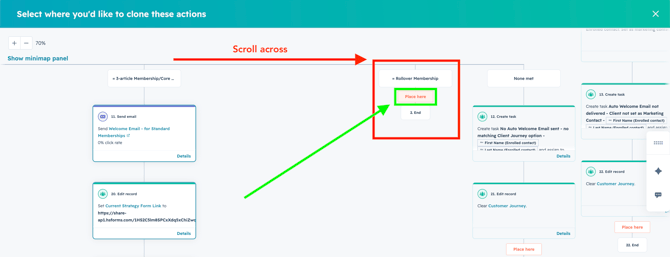
- Scroll across the workflow to find the new branch that matches your new client journey.
- For demonstration purposes, I've used the branch named 'Rollover Membership' as the stand-in for the fake new 'Example Membership' Client Journey (shown in red).
- Click on the button right below your new branch, labelled Place here (shown in green).
- Then, click Save.
- You now have the main structure set for your new Client Journey automation. All that's left is to change out the existing content for the new materials you created in Stage Two.
- The first workflow action is Send email (shown in red):
- Click it, then in the sidebar that appears, use the Automated email * search to locate the Welcome Email you created earlier (shown in green).
- Select your new Welcome Email (shown in blue).
- Click Save (shown in pink).
- The first workflow action is Send email (shown in red):

-
- The second action is Edit record:
- Click it, then in the sidebar that appears, change the Chose a value field to the form submission link for your new Strategy Document Form.
- Click Save.
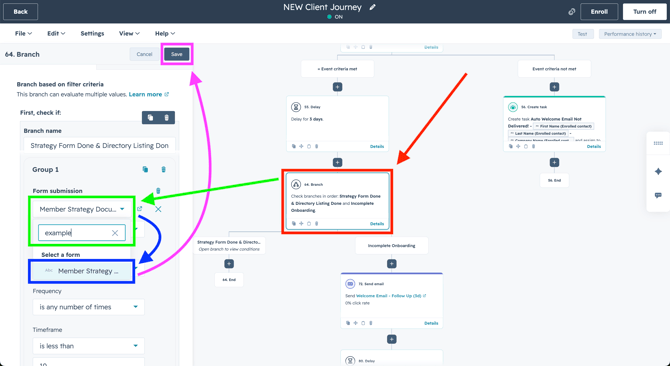
- Scroll down past the next branch in the workflow, to find the branch after it labelled “Check branches in order: Strategy Form Done & Directory Listing Done and Incomplete Onboarding.” (shown in red).
- Click on the Branch action, then in the sidebar click Edit criteria.
- Click the section under Form submission and editable fields will appear.
- Click the top editable field, and use the search to locate the Strategy Document Form you created earlier (shown in green).
- Select your new Strategy Document Form (shown in blue).
- Click Save (shown in pink).
- The second action is Edit record:
NOTE: You DO NOT need to change the Send email action further down, which is for “Welcome Email - Follow Up (3d)”. The email sent by this action will autofill using the url you provided in the Edit record step above.
When the Contact Record exits this workflow, they will be automatically enrolled in the one below…
***Automation 3: Send additional Onboarding Emails if applicable
- In HubSpot, go to Automation > Workflows. Use the search bar to find the Client Onboarding Emails workflow.
- Click on the first branch step, which is labelled “Check branches in order: No Intro Emails and Yes Intro Emails.”
- In the sidebar, you will see the criteria for the “No Intro Emails” branch.
- If your new Client Journey should not include these extra onboarding emails, click Edit criteria.
- Then click on the section underneath Group 1 and editable fields will appear.
- Click the third field down and add your new Client Journey to the list of options that should NOT receive these additional emails.
- Click Save.
***NOTE: Currently there is a branch action on the “Yes Intro Emails” branch which prevents ANY of these emails from sending. This is intentional, because these additional onboarding emails are out of date and need to be fixed.
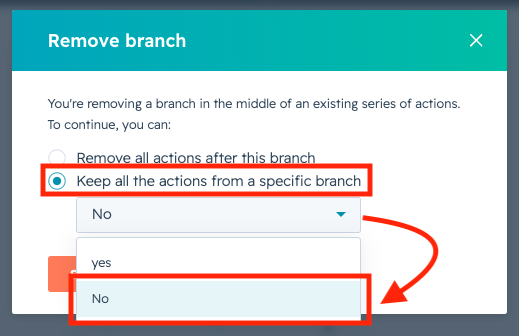
When the time comes and the emails are fixed, you must remove that extra branch action by clicking on the trash can icon.
-
In the Remove branch pop-up that appears, select Keep all the actions from a specific branch and choose the “No” option (shown in red).
-
Click Save.
And there you have it! Now the whole process will run as follows:
- Sales admin set the “Customer Journey” field on the Deal.
- The client signs the contract, setting the Deal to Closed Won.
- This triggers Automation 1, where the “Customer Journey” field is copied to the Contacts.
- This triggers Automation 2, where the client is automatically sent the appropriate Welcome Email, containing the correct Strategy Document Form.
- If the client does not complete the forms within 3 days, they are sent an automated follow up email containing the form submission link to the the correct Strategy Document Form.
- Once the client completes their Strategy Document Form, they are sent an automatic Confirmation Email containing all the responses they provided to us.
- When the Contact exits Automation 2, this triggers Automation 3, which (***eventually) will check if the client should get additional onboarding emails, and excludes those who don’t need them.